Getting started
QuipTrak helps your crew keep track of tools, equipment and consumables on every job. This article takes you from your first sign-in to a company that is ready to use.
Who can do this: anyone can sign up. The welcome wizard and the checklist are for owners and admins.
Create your account
Section titled “Create your account”- Enter your email address and a password.
- Select Create account. The password must be 12 to 128 characters.
- Check your email and verify your address.
You must verify your email before you can sign in.
You stay signed in for up to 30 days, then QuipTrak asks you to sign in again. Work saved on a phone while you were signed out is kept and sent once you sign in. When your password changes or two-factor sign-in is turned on or off, QuipTrak emails you, so you would notice if it was not you.
Create your company
Section titled “Create your company”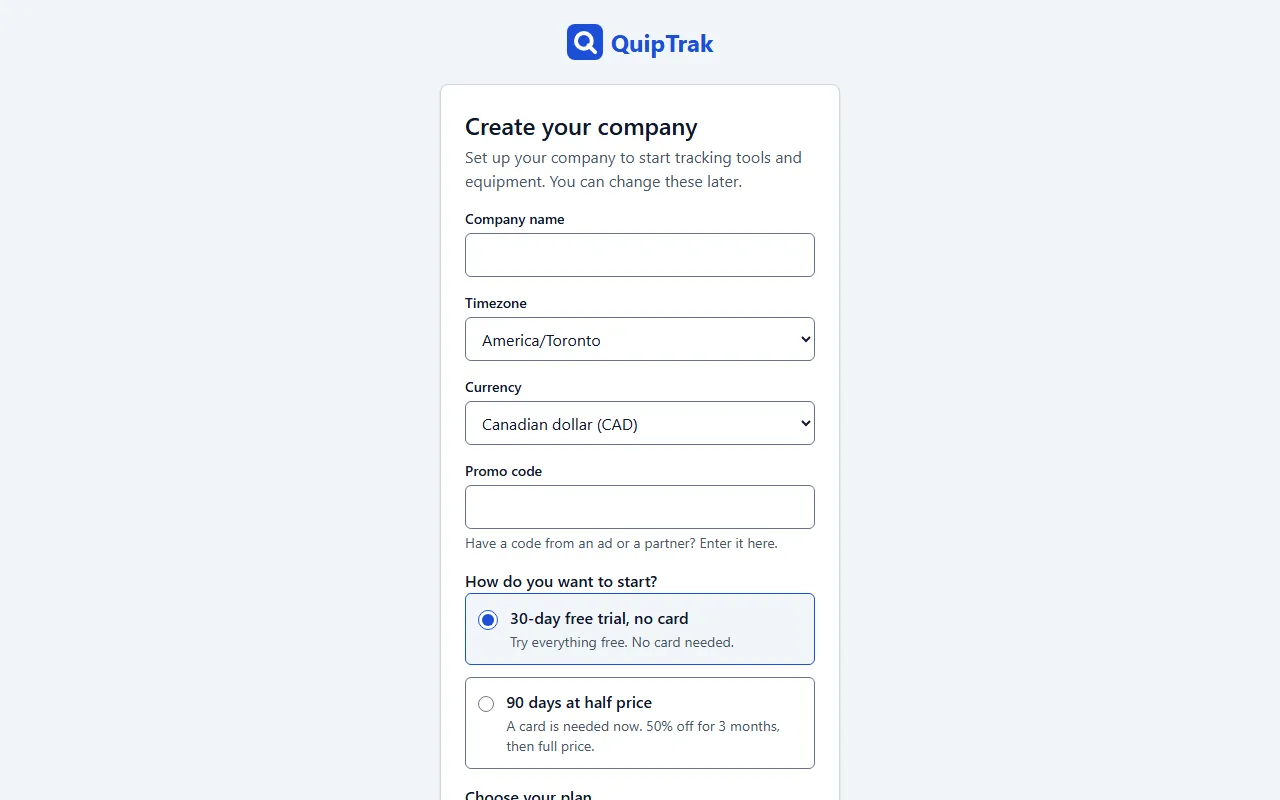
- Enter the Company name.
- Check the Timezone and Currency. They start as America/Toronto and CAD.
- If you have a promo code, enter it in Promo code. This is optional.
- Under Choose your plan, pick the plan you want to try. You can change plans later.
- Under How do you want to start?, pick one:
- 30-day free trial, no card: try everything free for 30 days.
- 90 days at half price: 50% off for 3 months, then full price. A card is needed now, and your Billing country sets the currency.
- Select Create company.
When a trial ends without a plan, nothing is lost and daily work goes on, but you can’t add new things until you choose a plan in Settings > Plan.
The welcome wizard opens. To compare plans first, read Billing and plans.
Use the welcome wizard
Section titled “Use the welcome wizard”The wizard has five steps: Your trade, Your places, Your tools, Labels and Your crew. Each step has Back, Skip and Continue. If you skip a step, you can finish it later from the checklist.
- Your trade: pick your trade from 12 choices. Your choice shapes the tool suggestions.
- Your places: enter a Location name and pick a Location type: Yard, Shop, Warehouse, Job site or Other. Enter a Truck name. It starts as “Truck 1”. Select Add another to add more places.
- Your tools: enter a Tool name, or tap a suggestion. You can add a Photo (optional). Select Add tool. To add many tools at once, select Import a spreadsheet (CSV). See Import.
- Labels: the wizard lists tools that have no label. Select Make labels to open the print dialog. See Labels and printers.
- Your crew: enter an Email and pick a Role, then select Send invite. See Roles and permissions.
The last screen says You’re set. Select Go to Home or Scan a tool.
Use the checklist
Section titled “Use the checklist”Home shows a checklist with a line that says N of 5 done. It has five items:
- Choose your trade
- Add a location and a truck. You need both.
- Add your first tools
- Put labels on your tools. This ticks when a label is attached to a tool. Printing blank labels does not tick it.
- Invite your crew
Select an open item to go back into the wizard for that step. When all five are done, the checklist goes away.
To hide the checklist, select Hide. This hides it for you only. To bring it back, go to Settings > My account and select Show the Getting started checklist.
Explore the sample company
Section titled “Explore the sample company”On the create-company page, select Explore a sample company first. The sample company is made up. It has:
- 2 locations (Main shop and Equipment yard) and 2 trucks and a trailer
- four made-up people who cannot sign in
- 20 tools in 8 types, 3 consumables and a kit
- 2 jobs, and some tools out with due dates
The sample company has no plan. It sends no emails, cannot invite anyone and is never billed. Its name starts with “Sample company:”, the company switcher shows “(sample)”, and a banner says “You’re exploring a sample company. Nothing here is real.” You get one sample company per person. If you try again, it opens the one you already have.
To delete it, go to Settings > My account, find Your sample company and select Delete sample. You can also delete it from Settings > Company. To switch between companies, use the company switcher.
Next steps
Section titled “Next steps”- Print labels for your tools: Labels and printers
- Scan tools with your phone: Scanning
- Check tools out and in: Custody and hand-offs
- Keep working without signal: Offline use
- Invite your crew and set roles: Roles and permissions
- Add many tools from a spreadsheet: Import
Get help
Section titled “Get help”To ask us something, open the Account menu and select Contact support. Choose a Topic and write your message. Under Sent with your message, the page lists what goes with it: your name and email, your company and role, the app version, your browser, and your phone’s sync status. Then select Send. You get a reference number on the page and by email, and we reply by email.
If sync is the problem, you can also open Contact support from the Sync page.